WSL install
ROS can run natively in Windows 10/11, as a docker container, or within WSL.
As the latter approach provides an experience that is (nearly) identical to the Linux experience, I suggest that one.
The Windows Subsystem for Linux (WSL2) allows to install and run a Linux distro(s) within Windows 10/11.
Linux apps are seamlessly integrated into Windows, consuming resources as required (and not being restricted to dedicated CPU cores as with usual VM solutions).
-
Follow the official installation instructions to install WSL2 and Ubuntu 20.04 (Focal).
Note that there are different install instructions for older versions of Windows 10.Advanced configuration
WSL2 employs Windows' virtualization capabilities to run an open-source linux kernel (patched by Microsoft).
The distribution is installed into a virtual disk, located in%LOCALAPPDATA%\Packages\distribution\LocalState\ext4.vhdxby default.Share a Linux installation between different users.
- Relocate the virtual disk file to a shared location:
Note: You can also edit the location of the virtual disk file in the registry and just move it around instead of exporting + importing. See next step.
wsl -l                                                 # list your available distros
wsl --export Ubuntu %TMP%\ubuntu-wsl.tar               # export filesystem as tarball
wsl --unregister Ubuntu                                # deinstall distro, removing ext4.vhdx
wsl --import Ubuntu W:\ubuntu-wsl %TMP%\ubuntu-wsl.tar # import tarball to custom location W:\ubuntu-wsl
wsl -l
- Copy the WSL registry entry between users:
- First, ensure that WSL is not running:
wsl --shutdown - Linux distros are stored in the user registry:
Computer\HKEY_CURRENT_USER\SOFTWARE\Microsoft\Windows\CurrentVersion\Lxss - Open
regedit, locate this entry, find the linux distro you want to share, and export the corresponding registry structure. - In the other user's login, import the registry file.
- First, ensure that WSL is not running:
Enable ssh into WSL
Essentially, your WSL is a separate virtual machine, having its own IP address. Hence, there are two options to ssh into your WSL machine:- Run an ssh server in Windows and forward any traffic to the WSL machine and its ssh server, described here.
- Directly run a WSL bash when
sshing into your Windows machine, described here as follows:Add-WindowsCapability -Online -Name OpenSSH.Server # Install ssh server in Windows Set-Service -Name sshd -StartupType 'Automatic' # Automatically start sshd service # Configure bash.exe as your default ssh shell New-ItemProperty -Path "HKLM:\SOFTWARE\OpenSSH" -Name DefaultShell -Value "C:\WINDOWS\System32\bash.exe" -PropertyType String -Force
- Relocate the virtual disk file to a shared location:
-
To run GUI applications, Windows needs to run an X server. Latest versions of WSL2 already provide a seemless GUI integration.
For older releases follow these hidden instructions.
Most people suggest [**`VcXsrc`**](https://sourceforge.net/projects/vcxsrv/).To direct WSL applications to your server, configure the
DISPLAYvariable in your.bashrcto point to the WSL nameserver:echo "export DISPLAY=$(awk '/nameserver / {print $2; exit}' /etc/resolv.conf 2>/dev/null):0" >> ~/.bashrc echo "export LIBGL_ALWAYS_INDIRECT=0" >> ~/.bashrc # required for OpenGL apps like rviz
Note that you can paste stuff from the clipboard into a Linux terminal via a right mouse button click.
Finally, launch
VcXsrvfrom the start menu. You can keep all default settings exceptNative opengl, which needs to be disabled. Otherwise, applications such as rviz will not run as expected.Note: You will also need to open your firewall for
VcXsrvto accept connections from the WSL2 network.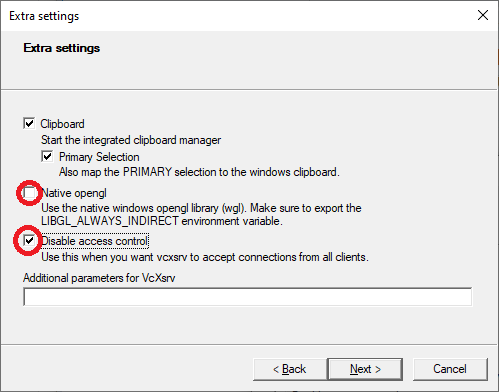
To test your X server configuration, you could start an X11 application like this:
sudo apt install xterm  # Install the X11 application xterm
xterm &  # This should open a terminal in a new window
If this shows an error like
xterm: Xt error: Can't open display: ..., check that you have started your X server correctly. You also might want to check the actual display name used by the X server. To this end, hoover with your mouse over the X-server icon in the system tray: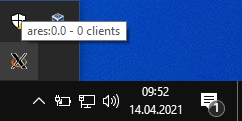
In the example,
ares:0.0is shown. Try the following command then (replacingares:0.0with your display name):DISPLAY=ares:0.0 xterm
and if it works change the
DISPLAYvariable in your.bashrcaccordingly. -
Follow the standard instructions to install ROS in your Ubuntu subsystem:
sudo sh -c 'echo "deb http://packages.ros.org/ros/ubuntu $(lsb_release -sc) main" > /etc/apt/sources.list.d/ros-latest.list'
curl -s https://raw.githubusercontent.com/ros/rosdistro/master/ros.asc | sudo apt-key add -
sudo apt update
sudo apt install ros-<distro>-desktop ros-<distro>-agni-tf-tools

sudo apt install python3-rosdep python3-catkin-tools
sudo rosdep init
rosdep update
-
Configure your
.bashrcto source the ROS environment by default:echo "source /opt/ros/<distro>/setup.bash" >> ~/.bashrc
-
Test your installation:
roscore &  # This just outputs some logs in the console
rviz  # This should open a visualization window
-
I suggest using Visual Studio Code for development (in a WSL environment and in general).
It provides an extension to access your WSL environment.